For this post, I’m going to discuss two very useful, but very different apps. “Tide Graph” provides tide information for virtually any location in the U.S. “f/8 DoF Calculator” provides everything you need to know to determine and properly set your camera for controlling the area of “perceived focus” in your images, otherwise known as depth of field (DOF).
“By the sea, by the sea, by the beautiful sea …”
A little over a year ago, I helped organize a photography master class along the Northern California and Southern Oregon coast. A friend and I arrived 4 days before the master class began to scout potential shooting locations. Here’s a case where I hadn’t done all my homework, and it was an iPhone app to the rescue!
As we drove up and down the coastline, it quickly became obvious that “to be at the right place, at the right time,” we needed to know something about the tide tables, a subject I admittedly, knew nothing about. As we were trying to determine the best times to shoot a number of coastal locations, it was very easy to determine the direction of the sunlight using LightTrac. In some cases we wanted to shoot sea stacks close to the shore, but the questions became, “how high will the water be?” and “will I be standing on the beach or in 4 feet of water at shoot time?”
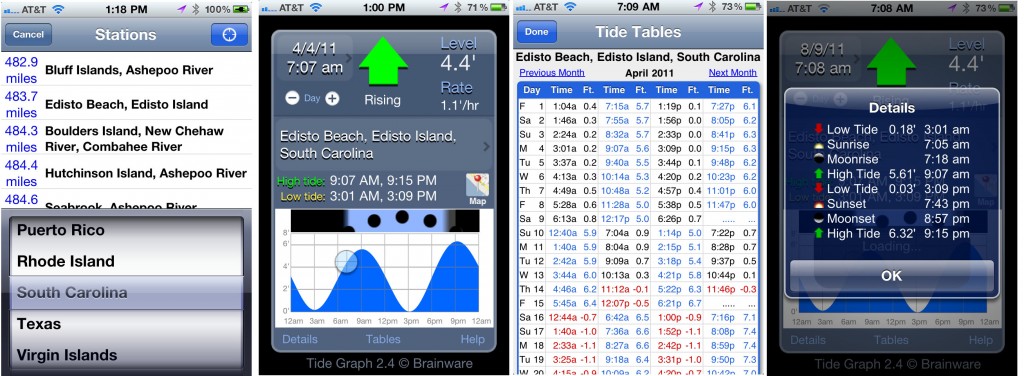
As we were driving, I connected to the iTunes App store and did a search for “Tide,” and the first app that appeared was called, Tide Graph. The app cost $1.99 and the reviews looked very good, so I quickly downloaded it. Within 5 minutes, I was a big fan of Tide Graph! I was immediately impressed with the usability of the app. This is one of those little specialty apps that does an extraordinary job of making your shooting life easier. The app predicts tide heights at thousands of U.S. coastal stations, and presents them in both an interactive graphic view, as well as a monthly tide table view. If your specific location isn’t listed, just pick the closest station, and the station data even calculates your distance from that station.

Unlike sunrise and sunset, which vary by a minute or two each day, the daily change in the tides, is far more variable. The information on the interactive graph screen (2nd screen shot) is extensive: the date and time for the tide information, whether the tide is rising or falling, the level of the water and the hourly rate of change, the times for both high and low tides, a graph showing the tide movements over a 12 hour period, with the ability to move the “bulls-eye” (current water level) and see at exactly what time the tide will be at whatever level you choose. You can input the date, move backwards or forwards by pressing the “+” or “-“icon, or view the monthly table view, which shows the tide info every day, for any month.
On the “Details” screen, the app even provides sunrise, moonrise, sunset and moonset times, along with the high and low tide info.
For $1.99, every photographer should have this app! Buy it, play with it, and the next time you’re shooting near the water, use it!
“Is this shot not fully in focus, or do I just need new glasses?”
O.K., I must admit it, I love sharp images. As we all know, “sharp” is in he eyes of the viewer, and at times photographers intentionally make photographs, or parts of their photographs, less than sharp. I’ll show my age, but can remember putting a skylight filter on my favorite 50mm f/1.4 lens and smearing Vaseline on the filter to give a “soft” look to certain photographs. A very crude petroleum-based LensBaby of yesteryear! But today, for the vast majority of my work, controlling the perception of sharpness in an image is very important to me.
“Depth of Field (DOF)” is defined by Wikipedia as, “the distance between the nearest and farthest objects in a scene that appear acceptably sharp in an image.” Note the phrase, “appear acceptably sharp.” There is definitely a degree of subjectivity involved, as well as the eyesight of the viewer! “Hyperfocal Distance (HFD)” is the focusing distance you set on your lens (auto-focus turned off), such that when focus is set to this HFD, the DOF (area that appears acceptably sharp) extends from one-half the HFD to infinity, and that DOF is the largest for the given f/stop. For example, if you know the HFD using a given f/stop and given focal length is 30′, that means that hypothetically, everything will “appear” in focus from 15 feet (1/2 the HFD) to infinity. Most older, fixed focal length lenses had a DOF scale on the lens barrel. This is not the case with today’s zoom lenses.
Some of you are thinking, “No problem, I’ll just set the smallest f/stop on the lens (i.e. large numbers, like f/16, f/22, etc.) and my DOF issues are solved. Do a little reading about diffraction.” and be sure you understand the implications of small f/stops. Beyond some point, increasing the f/stop actually decreases sharpness, even though DOF may be increasing!
Enough of definitions and technicalities! Needless to say, if you want to control the DOF in your photograph, you need to 1)understand the most basic principles behind optics, 2)know how to do the calculations to determine DOF, and 3)carry with you, DOF spreadsheets, cards, OR a great iPhone app that does all the work for you. The variables used in DOF calculations are: sensor size, circle of confusion, f/stop, focusing distance, focal length. Note:”normal” DOF calculations do not accurately measure very close focusing distances, such as when using macro lenses. See your the macro lens manual for details.
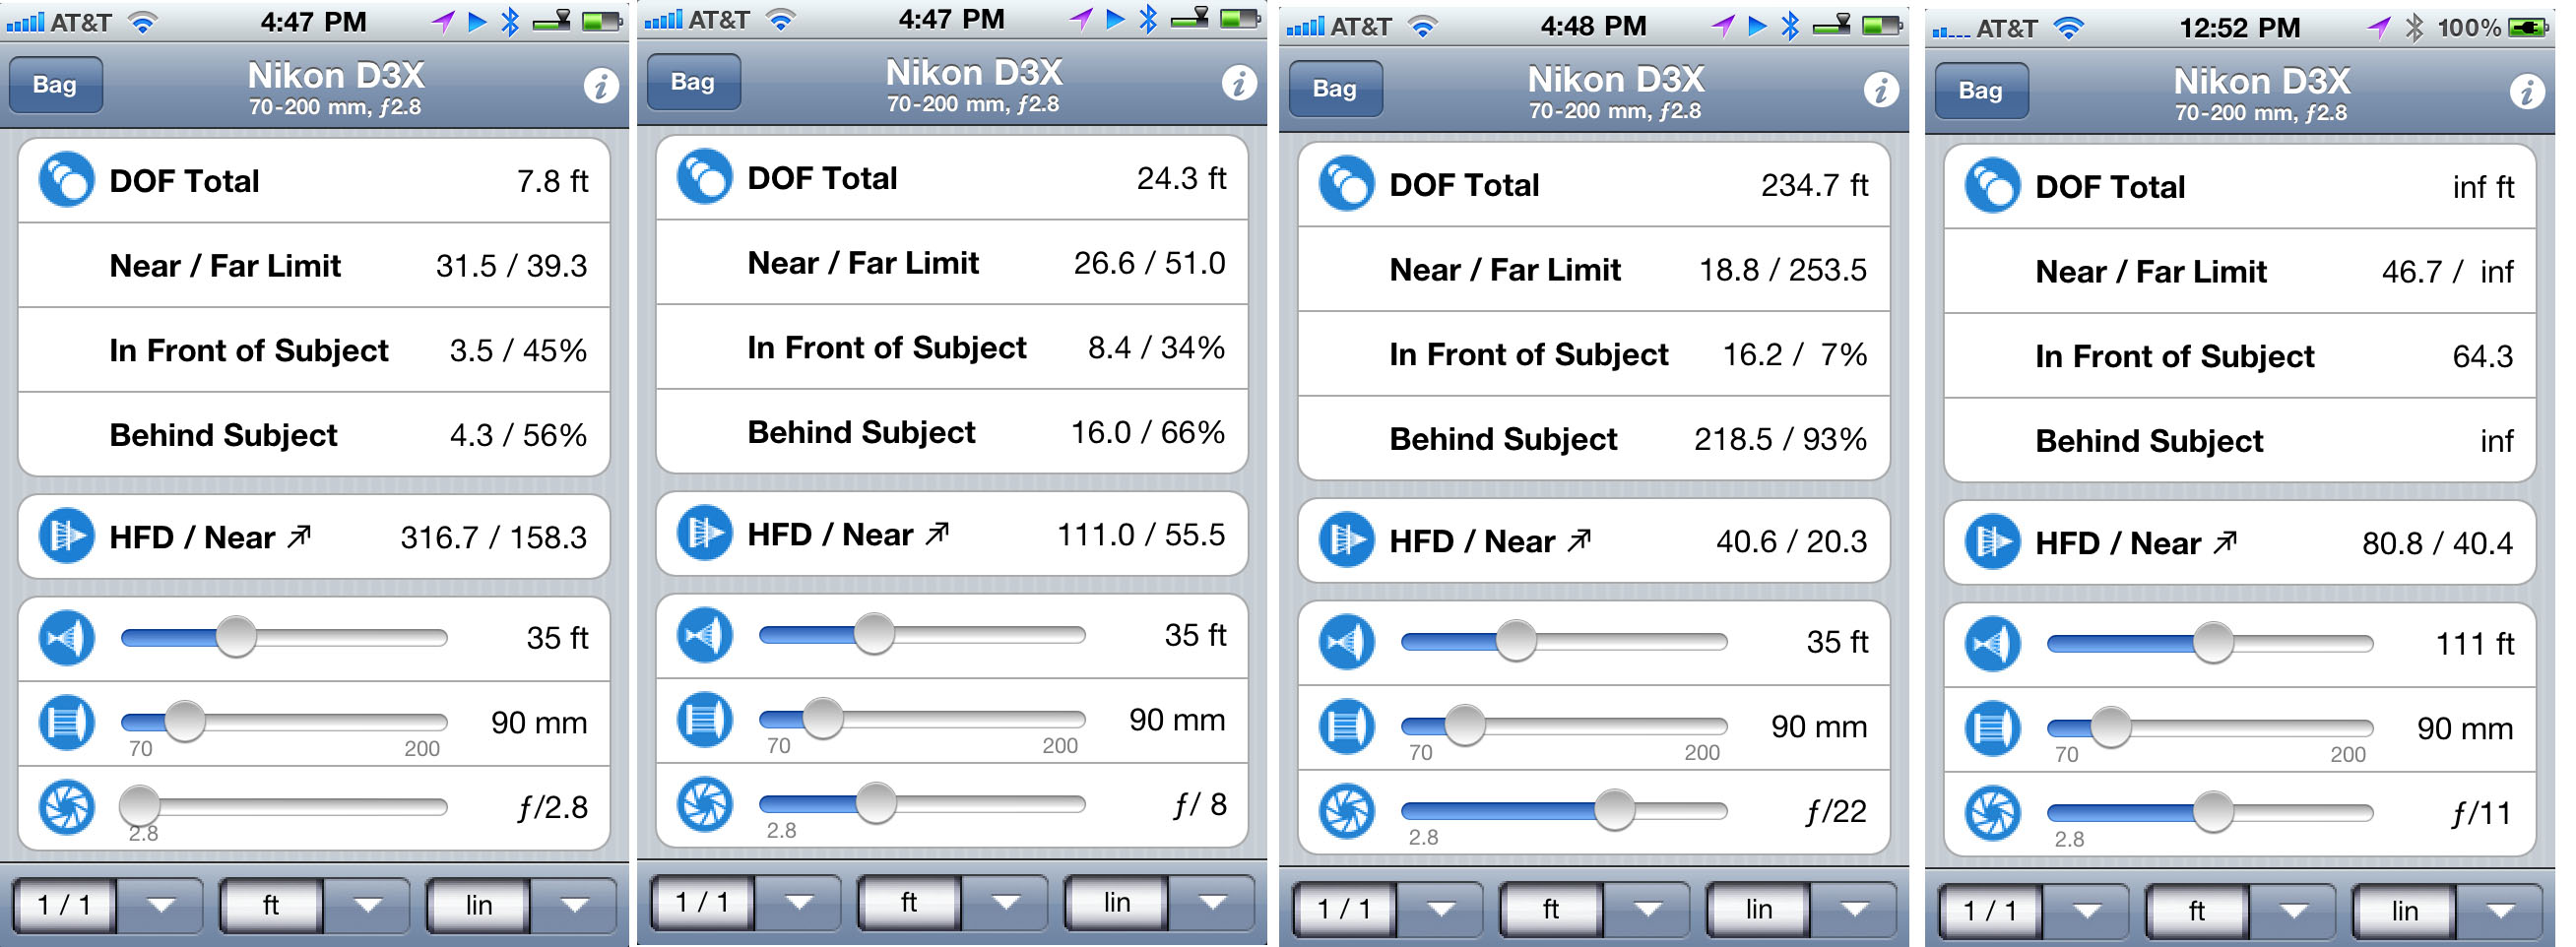
So that this post doesn’t become a short novel, let’s jump to the chase! There are over 50, yes 50, apps in the iTunes app store that calculate DOF! I have tried a number of them, and my favorite is f/8 DoF Calculator priced at $3.99 from Bitwerkz. It is the most user friendly DOF app I’ve used because you use sliders to enter the few bits of data that are needed, which is far easier than inputting numbers from the keyboard, and you can store info about your cameras and lenses in the “camera bag,” where you can easily make changes as you change equipment. (If the screen shots below are not easily viewable on your screen, “click” on the image for enlargement).
![IMG_0330[1]](http://www.alansislenphotography.com/blog/wp-content/uploads/2011/08/IMG_03301-200x300.png)
As you can see from the few examples in the 4 screen shots below, a 70-200mm f/2.8 lens is being used, focused at 35 feet, with at a focal length of 90mm. The f/stops in the first 3 screen vary from f/2.8 to f/8 to f/22. Notice how the DOF numbers change as the f/stop is varied. The 4th screen shot is different. Using an f/stop of f/11, I pressed the HFD icon in the middle of the screen, and the app calculates 80.8 feet as the HFD, i.e. if you focus (obviously, on manual focus) at 80.8 ft., you will to obtain the maximum DOF of approximately 40.4′ to infinity. Obviously, we can’t focus at 80.8 ft. without a tape measure, so we have to estimate the focusing distances in the field.

The app comes with presets for more than 800 cameras, and you can input the information for your lenses, or if you have many lenses, you might just want to buy the $.99 lens database add-in, after you buy the basic app. There is also a “Landscape View” $.99 add-in that activates when you turn the iPhone in a landscape orientation, and you’ll see a graphical representation of your data (the “bird” is your subject!). ![IMG_0336[1]](http://www.alansislenphotography.com/blog/wp-content/uploads/2011/08/IMG_03361-e1313165734824-300x200.png)
There are many other DOF apps out there, but for my needs, f/8 DoF Calculator does the job for me.
If you’ve read all the way to this point in this blog post, you should have the chance to be rewarded! Thorsten Kramp, the author of f/8, has very kindly provided me with 8 free versions of the app. If you’re one of the first 8 people to email me, I’ll send along the iTunes App Store redeem code. Thanks Thorsten!
This is the last in our little 3-part series on iPhone apps for photographers. As I mentioned in my first post, the least used app on my iPhone is the telephone! I hope this series of posts about iPhone apps helps make your photographic endeavors easier and more productive. Let us know what photography apps YOU like!
As always, I’d appreciate your comments and if you liked the post(s) click “Like”, and share posts by clicking on the “Share” button. If you are viewing this post directly in the blog, just “Reply” at the end of the post with your comments. If you’re seeing this blog post from Facebook, an RSS feed or from a subscribed email, “click” on the title of the post, which takes you to the actual blog post, where you can “comment” at the end of the post.


